Copyright (C) 2000, ACT-Europe
This document may be copied, in whole or in part, in any form or by any means, as is or with alterations, provided that (1) alterations are clearly marked as alterations and (2) this copyright notice is included unmodified in any copy.
Glide is an integrated developement environment developped by Ada Core Technologies. The system includes the Emacs editor, the GNAT toolchain and a graphical debugger. The purpose of this bundle of tools is to simplify the creation and management of your software projects, whatever their size and complexity.
The purpose of this tutorial is to present the major features of Glide so that you can start developing with it as quickly as possible. If you have never used Emacs or the Ada-mode, don't be intimidated, this tutorial has been created for you. Experienced users might find some parts of this tutorial boring or trivial. These parts are signaled with two asterisks and thus can be ignored by the well-informed.
The following explanations are focused on Glide on its own. Thus, no distinction is made among its various components. As a result, the word Emacs does not appear in that tutorial (among other things so that "the non Emacs users" are not scared away by the reputation of that editor). Whenever an Emacs-specific function has to be described, we use such terms such as editor or Glide editor to refer to it.
This tutorial is composed of three parts. They follow the different stages you encounter when you must write an application. The first teaches you how to manage a set of files and a project; the second how to compile, run and debug it; the last one deals with other useful development tools.
This section describes the process of the creating and editing a new file and a new project. In the case of a project, we also describe of how to modify it.
Warning for Emacs users : This section is marked with two asterisks. It means that you can safely ignore it, it does not contain anything that you don't already know.
Whenever you interface with Glide, you can use the shortcut C-G
(type Control and g) to cancel your last command. For the numerous and
very useful shortcuts of that kind, see the annex at the end of this tutorial.
Creating a new file
In the menubar of Glide editor, click on the Files->Open File
item. A query in the status line (at the bottom of the editor window) will
prompt you for the name of the file you want to create. Type the name of
the desired file and confirm your command. To go faster,
you can use the C-x C-f shortcut, as in the menubar.
Opening a file
To open an existing file, follow the same steps as above and write the intended file name when prompted.
For example : Let's assume that your are working in the directory called
glide_demo. To open the file /glide_demo/first_file.ada, select
Files->Open File in the menubar. At the bottom of the window,
write /glide_demo/first_file.ada and confirm. A blank page will be
displayed if file with that name did not exist in your directory,
the file will be
opened otherwise. You can now modify this file. To save your
modifications, select the Files->Save Buffer menu.
For Ada files, you will notice that the menu
called Glide is replaced by a new menu called Ada. The
items on this menu are Ada-oriented. You will have henceforward at
your disposal a number of useful tools for programming in Ada. Those tools
are not fully explained in this tutorial, whose purpose is only to
give you an overview of Glide. For more information, refer to the Glide
documentation, which is available on line.
At that point, you should be able to create, open, modify and update a file. However, the programs you will write are certainly more complex than a single file. That is the reason why Glide provides the project concept, which is described in the following section.
In Glide, a project is a set of commands and configurations to be used when working on an executable. It gathers all the configuration information that Glide may need to build your application. For instance, the information may include the name of the directory where you want to build your project as well as the different options to compile your application. Whenever a file is created, Glide associates a project with it. For simple applications made of a few files, you do not need to specify a project on your own; in fact, Glide will do it for you by using a default project. By contrast, for big applications, we recommend that you create a new project as described in the following section.
Let's keep on our previous example. We are in the /glide_demo
directory. We have added other files to make our application; for
instance, second_file.ads / second_file.adb, third_file.ads /
third_file.adb, each of those files containing some packages, and
main_file.adb, the main unit. At this point, you want to create your
project file. To do so, click on the Ada->Project->New menu. In
the status line, enter the name of your project. We advise you to give
the same name as your main procedure with the extension ".adp"(in our
example, main_file.adp). This will allow Glide to fill the appropriate
configuration fields itself.
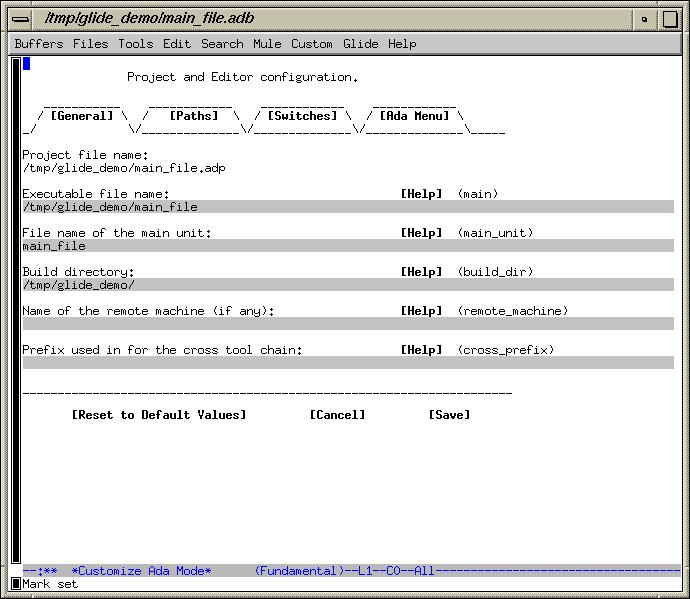
A pop up window entitled "Project and Editor configuration" like the
screenshot below is displayed. Note the four main tabs General,
Paths, Switches and Ada Menu, selectable by clicking on the left
mouse button when the mouse pointer is on one of them. Whatever button
of the four you click, you will see the same kind of window popping up.
The window you can see first is the General menu which is
selected by default. You can refer to the picture below to understand
the following explanations on that window.
General menu
Unless you have not followed the advice we gave above on your project's
name, you should see the first three lines of that window already
filled. You can change them if those default specifications don't suit
you. In that case, whenever you are uncertain on the rule of the
selected line or on its syntax, click on the help button beside,
it will provide details. The word in parentheses beside the
help button stores what you wrote on the corresponding line. This
variable will be very useful later on; typing the name of these variables,
preceded by a '$' will reference the whole line you entered and will
save having to retype it again each time you need it
Let's come back to our example :
/glide_demo/main_file.
The last two lines are useful when you want to build your application on a machine different from the one on which you are writing code. For more details on that subject, please refer to the Glide documentation.
PATHS menu
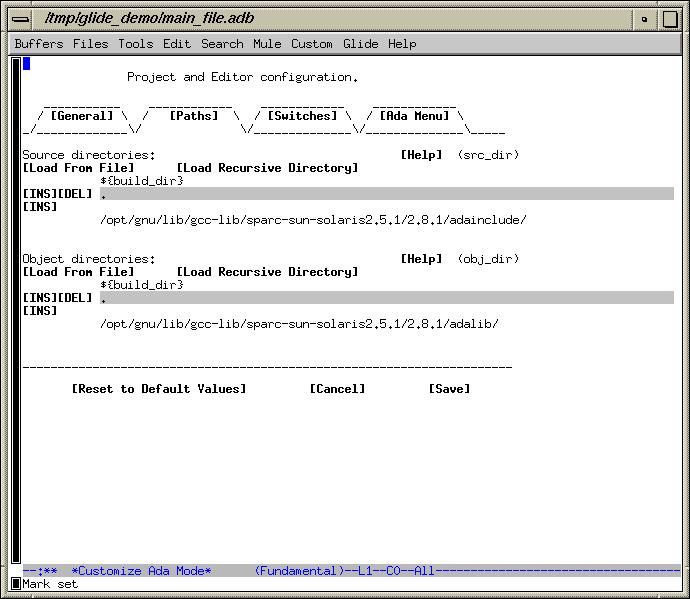
The PATH tab allows you to set the directories where Glide will search for
the source files and the object files needed to build the project.
Note the use of the
$build_dir variable, whose value has been specified in the
previous menu. As explained before, this variable is an alias for the
line you entered to set the directory where you want to build your
application.
In our example, we do not need to specify source and object
directories other than the one referred by $build_dir (`glide_demo'). This
means that all the sources and object files Glide must use to build our
application are already gathered in `glide_demo'. In a more
complex application you may need others directories, in that case, write
the name of the directory containing the sources (the objects) files you
need on the first (second) line. Click on INS button to add a new
line. To delete a line, click the corresponding DEL button.
In particular cases ...
(You have a lot of directories) If you find that filling the line and
clicking becomes too tedious for your fifty directories, we
recommend that you to create a file from the Unix or Windows shell, listing
all the directories (Source or Object) you need. Then, select the
Load From File menu, above each line and give the name of the
"listing file" to Glide in the status line.
(Your vital files are gathered in directories depending on a root directories). For instance:
        glide_demo/
                |
                |
                 - -> first_packages/
                |
                 - -> second_packages/
                |                  |
                |                  |
                |                   - -> detailed_packages/
                |
                 - -> third_packages/
If your source directories have such a configuration, they are all
under a root directory (here glide_demo). In this case click on
the Load Recursive Directory button. Selecting that
menu and providing the name of the root directory will save you the
trouble of typing each directory and file name under the root: Glide will
automatically search all subdirectories in the tree for requested files.
Switches menu
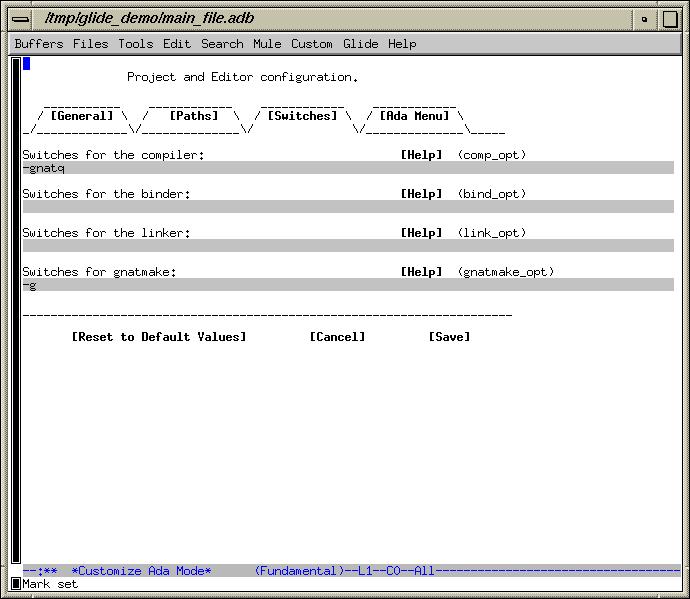
The Switches menu window allows you to change the compiler,
binder, linker and make options. When you open that frame, its contents
are already filled with default options. To modify them properly, we
advise you to consult the GNAT documentation to obtain the list of the
available options for each.
-g is required if you want
to generate debugging information, so that you can subsequently run
your Ada application under a debugger.
Ada Menu
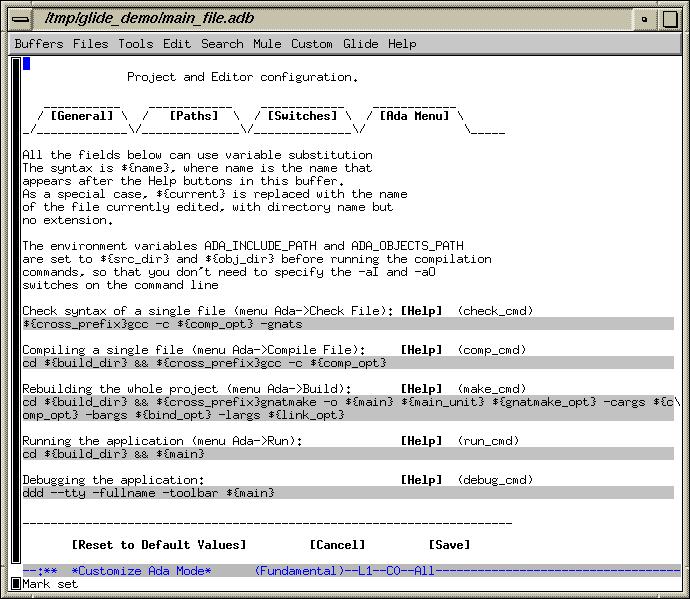
In most cases this window must not been altered. Read the documentation for the rare cases where you have to modify it in some way.
The following three buttons are common to the previous four windows:

Reset to Default Values button restores the project file to
its default state.
Cancel button allows you to exit the project file without
applying any of your modifications.
save button will, unlike the Cancel button, update
your project file with the changes you have just introduced. It will end
the project file editing session as well. Therefore, save your project file
only when you have completed your modifications;
Once your project is created, you may want to edit it in order to change
some of its properties. In this case, select
Ada->Project->Edit item; this will edit the project associated
with the current file. You can now make all the modifications you want
and save them by clicking on the Save button of one of the four
pages.
The next stage of your work is to build your application, so that you
can check its behaviour. To compile the different files and create
an executable, select Ada->Build item. Your main window is split
into two parts (please refer to the screenshot below). The upper part is the
source file from which you called the build command, and the second part is
the output of the build.
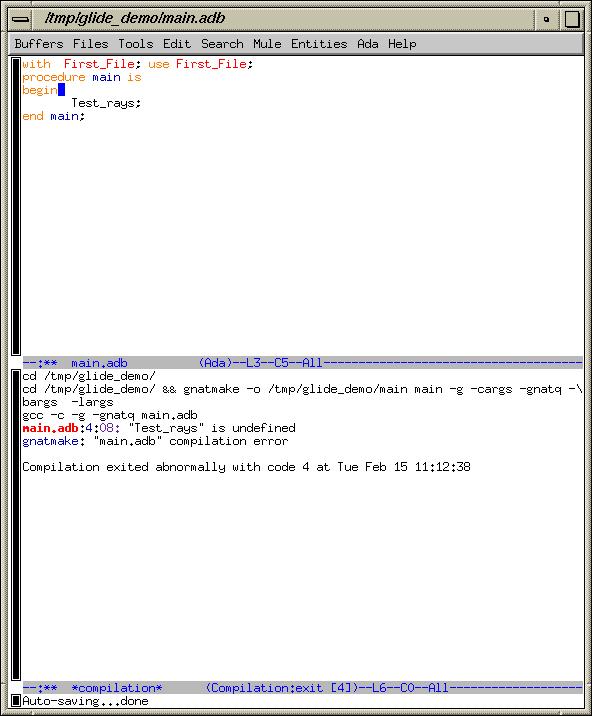
The errors that Gnat detects are listed there. The name of the file appears
first, followed by the line and row numbers of the file where the error was
detected, followed by the error message itself.
To reach the error quickly, click on one error
line. Glide moves the cursor to the relevant file, line and
column. Correct the errors, save the files (@code Files->Save Buffer
whenever you have modified a file) and rebuild the application, until
Glide displays Compilation finished.
When Glide indicates no errors, run your application by clicking on
Ada->Run. In the status line, enter the name of the executable if
the one specified in the project file (and then chosen automatically by
Glide) is not the right one. You should now see your application running.
Nevertheless, if it does not work as expected, read on because now you may need to debug your code.
The debuggers available within Glide depend on the platform on which you are programming. Unix users have a choice between DDD and gdb. DDD, a powerful graphical debugger is chosen by default. Windows NT users currently have no choice and have to use gdb (work is in progress to port DDD to NT). NT users who want to use a graphical debugger, can launch GDBTK, but this debugger works on its own and is not able to interact with Glide.
First of all, check the debugger you can use. To do so, you have to go
back to the configuration file, your project file. Edit your project
by choosing the Ada->Project->Edit item in the menubar and then
select Ada Menu tab. The last line of the Ada Menu window,
called Debugging the application, allows you to set or check the
kind of debugger you want to use.
For Unix users You can change the debugger set by default (DDD).
Click on the Help button, the following pop up dialog is
displayed.
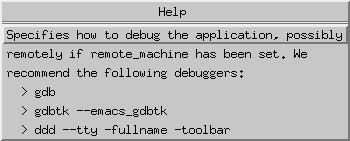
It shows the command that you should enter in the Debugging the
application line to choose another debugger.
The next chapter is addressed to unix users; it will give them a few pointers to get started debugging with DDD.
The graphical debugger available by default on Glide is called DDD, the Data Display Debugger. It has a sophisticated graphical interface and is well adapted to all debugging tasks. Switching from any debugger to DDD should be quite simple.
To start the debugger, use Ada->Debug. A new menu
named Debugger appears within Glide. It contains all the major
features used for debugging a program. At the same time, two DDD windows,
a data window and a command tool appear.

The data window displays in its grid space the selected expressions of the debugged program; the command tool allows you to execute the most frequently used gdb commands by a simple click on the associated button.
One important aspect of Glide is its ability to provide the user with several ways to launch a given command. All depends on how you prefer to debug, from the Glide Editor or from DDD data window.
The purpose of this introduction is only to provide an overview of the basic
debugging commands you can launch from Glide. If you need to know
more about the DDD debugger, please refer to its online manual, available via
Help->DDD Reference in the DDD help menu. To summarize, all the
commands you can access in Emacs or in the command tool can also be
launched from the DDD scrolling menus.
In the following section, we assume that a project file has already been opened within Glide and that debugger has already been started.
WARNING : We recommend that you use Glide to open a file rather than DDD's
menus. DDD was actually designed to support Emacs as source editor. But
it was initially conceived to run on its own. Hence some options
started from DDD may not work with Glide. It is better to use their Emacs
equivalents. This is the case in particular for the items beginning with
File->Open ....
To start the debugging process, the Ada programmer will usually type
the begin command to reach directly the main program. To do so,
click on the Start button of the command tool. If
you have already placed some breakpoints (see the following section)
in the source editor you may prefer using the run command. In
Emacs, you have two choices. Either you select the item of the same
name from the Debugger menu or from the contextual menu
displayed by clicking on the mouse right button when your pointer is
in the source editor.
You can stop the debugged program at some specific points, called breakpoint, in your source editor. To do so, follow the instructions below.
In the source editor, place your mouse pointer on the line on which you want to
set the breakpoint. Then, display the contextual menu with a mouse right
button click, and select the Temporary breakpoint item if you
want to delete it as soon as your program has reached it; otherwise
select the Breakpoint item. The Debugger->Set Breakpoint
allows you to do the same thing.
To set a breakpoint on a source which is not currently displayed, or on
exceptions, the faster way is to click on the Break button of
the command tool. You can also use the scrolling menu
Source->Edit Breakpoints of the data window and next click on the
stop picture at the top of the dialog.
By clicking on the command tool, a new dialog will be appear.
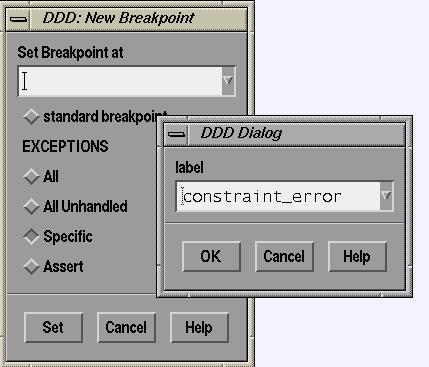
This one allows you to put any kind of breakpoints in the source
editor. That means you can either specify its location, or place
breakpoint exception. In both cases, you must set the associated toggle
button if it has not been done yet. For instance, to put a "usual"
breakpoint set the first toggle button and use the textfield labeled
Set breakpoint at to specify its location. To put a breakpoint
exception you just have to choose the right toggle button! Finally,
click on the Set button to send your request to DDD.
Select Source->Edit Breakpoints from the data window to
visualize the breakpoints list you have just set. The text editor
displays on the right side the information available on the
selected list breakpoint.
A convenient feature of DDD is its ability to save in a session file
all the work you did on a debugged program. That means you
can save the breakpoints you set in the source editor, the expressions'
displays in the data window, the state of your backtrace, etc. You will be
able to resume your work where you left off the next time you reopen
that session. The past context will be completely restored. To save
your work in a session, select File->Save Session As item from
the data window and give it a name. To reopen it, use File->Open
Session.
The Status->Threads item of the data window corresponds to the
tasking dialog for the Ada program being debugged.
After reading the DDD reference from the Help menu, you may want to
add new options for the startup of DDD. For instance, you may prefer
running a session by giving its name after the option --session
rather than using the File->Open Session menu. Glide allows you to
do this by altering the Ada Menu debugging Application command
line. To reach it, you have to select Ada->Project->Edit item
and then select the Ada Menu.
In that chapter we present three particularly useful tools from the numerous ones that Glide provides. They are the cross references, the speedbar and the version control.
WARNING : To use that tool, you must have built your
application once. (Ada->Build)
They are four types of cross references. Each one allows you to reach easily some parts of your programs.
We will base our description of this tool on a fictitious application
located in the `/glide_demo/' directory. Look at the following
screenshot of the file /glide_demo/main.adb describing the main
unit of our example. The main procedure calls the Test_Arrrays
function. You may want to get more information on that subprogram; in
other words, examine its declaration and its body. This can be done
with the first type of cross reference, as follows.

Point your mouse to the call of the function or procedure you are
interested in, (in the example, our mouse is on Test_Arrays) then
click on Ada->Goto->Goto Declaration/Body (the first item of the
second menu). To speed up the operation, use the shortcut
@code(Control c Control d) when your mouse pointer is on the procedure.
Your main window is
now split into two parts. The first displays the source from where you called
the cross reference, and the second displays its destination. One click will
bring you to the procedure declaration. A second click this declaration
will display the procedure body.
You can do the same thing to reach the declaration or the body of a
package. Place your mouse on the name of the package, for example its
declaration (respectively its body), select Ada->Goto->Goto
Declaration/Body, the other part of the window now displays the package
body (respectively the package declaration).Using the cross reference in
the manner indicated splits the window into two portions that
display the file containing the declaration or body. You may prefer
to open a new window and stay on your edited file. In that case,
select the Ada->Goto->Goto Declaration Other Frame.
In order to locate the previous occurrence of a given entity,
point your mouse to the occurence word in the file in which you are, and
click on Ada->Goto->Goto Previous Reference item. To speed up the
process,
select the first item of the contextual menu (Goto Previous
Reference) displayed by clicking with the right mouse button in the
Glide editor. As a result Glide will lead you to the previous occurence
in the current file of
the word you have just selected.
Back to our example : imagine you want all the files containing a
call to the Test_Arrays procedure. Point your mouse on
any occurence of the procedure, then select Ada->Goto->List
References item.
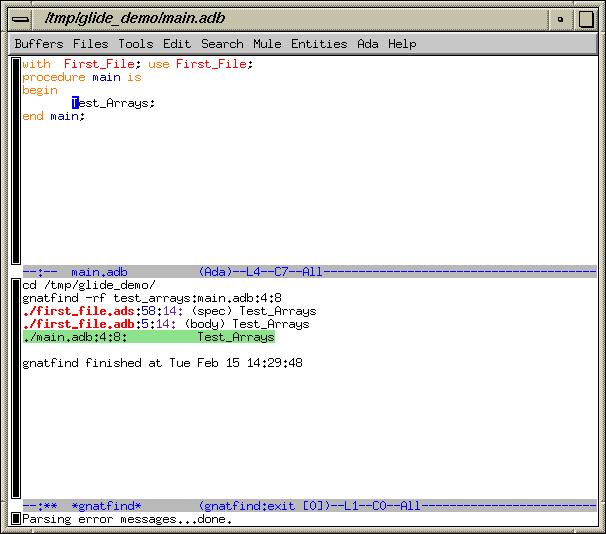
Your main window is now split into two parts. The second one lists all
the files where the function name Test_Arrays is used. In our
example, the function is used in three files. If you now want to reach
one of the three occurences, the second one for instance (the body,
`./first_file.adb:5:14'), click on the mouse center button. That
action opens the file `first_file.adb' and moves the cursor to the
body of that procedure.
To sum up, if you want to list all the files where you can find a given variable, procedure, function or package name and then reach their occurences, use this menu item. The only problem with this kind of search is that you must have one occurence of the entity of interest in the file you are editing, because you must be able to point to it with the mouse. The cross reference feature described next does the same thing but does not require any occurence of the entity in the current file.
If you are in a file where there is no occurence of the entity you are
looking for, click on Ada->Goto->Goto Any References to any
entity. At the bottom of your window, in the status line, enter the
name of the entity. Glide displays the list of files where it detects
the presence of that entity. As above, to reach a specific occurence,
simply click on the list and confirm.
This tool is a kind of "cross reference abbreviation". Its advantage compared to cross reference operations is that it allows the user to visualize the set of files comprising the application. Look at the speedbar of our short example.
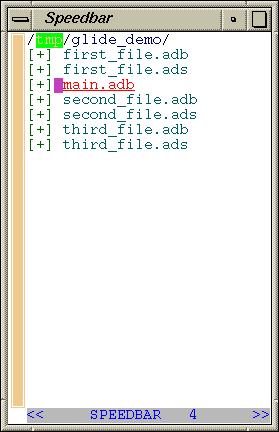
At a glance you can estimate the complexity of the application (the number of files). Note that the file you are editing is displayed in red; if you want to edit another file, click left (on the left mouse button) on the desired name in the speedbar.
Everytime you see a + beside the name of the file, it means that
other menus are within; you must double click on the + to make
them appear. Let's suppose that we want to see what is behind the
`first_file.adb' menu. The result of double clicking on it is
displayed below.
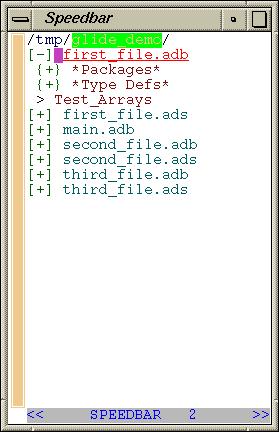
This screenshot displays two other menus called *Packages* and
*Type Defs* (you can double click again) and a subprogram called
>Test_Arrays.
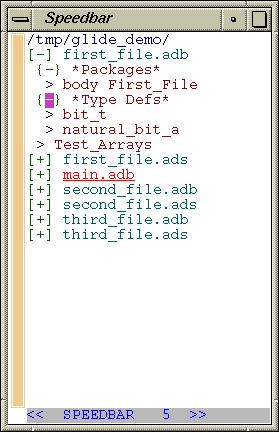
>body
First_File
(we have to double click on the + beside
*Packages* to make it appear).
*Type Defs* menu is used to declare two new types >bit_t, natural_bit_a. You can reach
their declaration by selecting the ones you want to read.
When several programmers collaborate on an application, or when you want to track successive revisions of a file on which you are working, you must be able to save and retrieve different versions. You can do that by using CVS, RCS or CLEARCASE.
To register a version of a file, you must check it
in. Select Tools->Version Control->Check In/Out. The Glide editor
splits into two parts. The upper part edits the file you are going to
check in, that is to say the new version of this file you are going to create;
the second part is blank. Glide waits for you to enter a
comment explaining the changes you have made to the file.
Write your comments in the blank part and enter
Control C-Control C once you have finished. Glide warns you in
the status line that you cannot write anymore on that file because this
version has been saved.
Now, if you want to work on the latest version of a file, you must
check it out. To do that, select the same item as above,
Tools->Version Control->Check In/Out. Glide indicates you that
your file has been checked out. You can now work again on that version.
If you want to find out the different versions registered for a file, click
on Tools->Version Control->Show History. Glide displays
the list of version numbers, the author of each, the date at which they
were checked in, and the comment provided when that version was created.
For more details on "Version Control", you should read the Emacs documentation on line.
This document was generated on 3 November 2000 using texi2html 1.56k.